
Hello readers
I wanted to share a project that I have recently completed. If you follow me on social media (which you really ought to be doing to keep up to date and get insider info), then you might have seen peeks of this project.

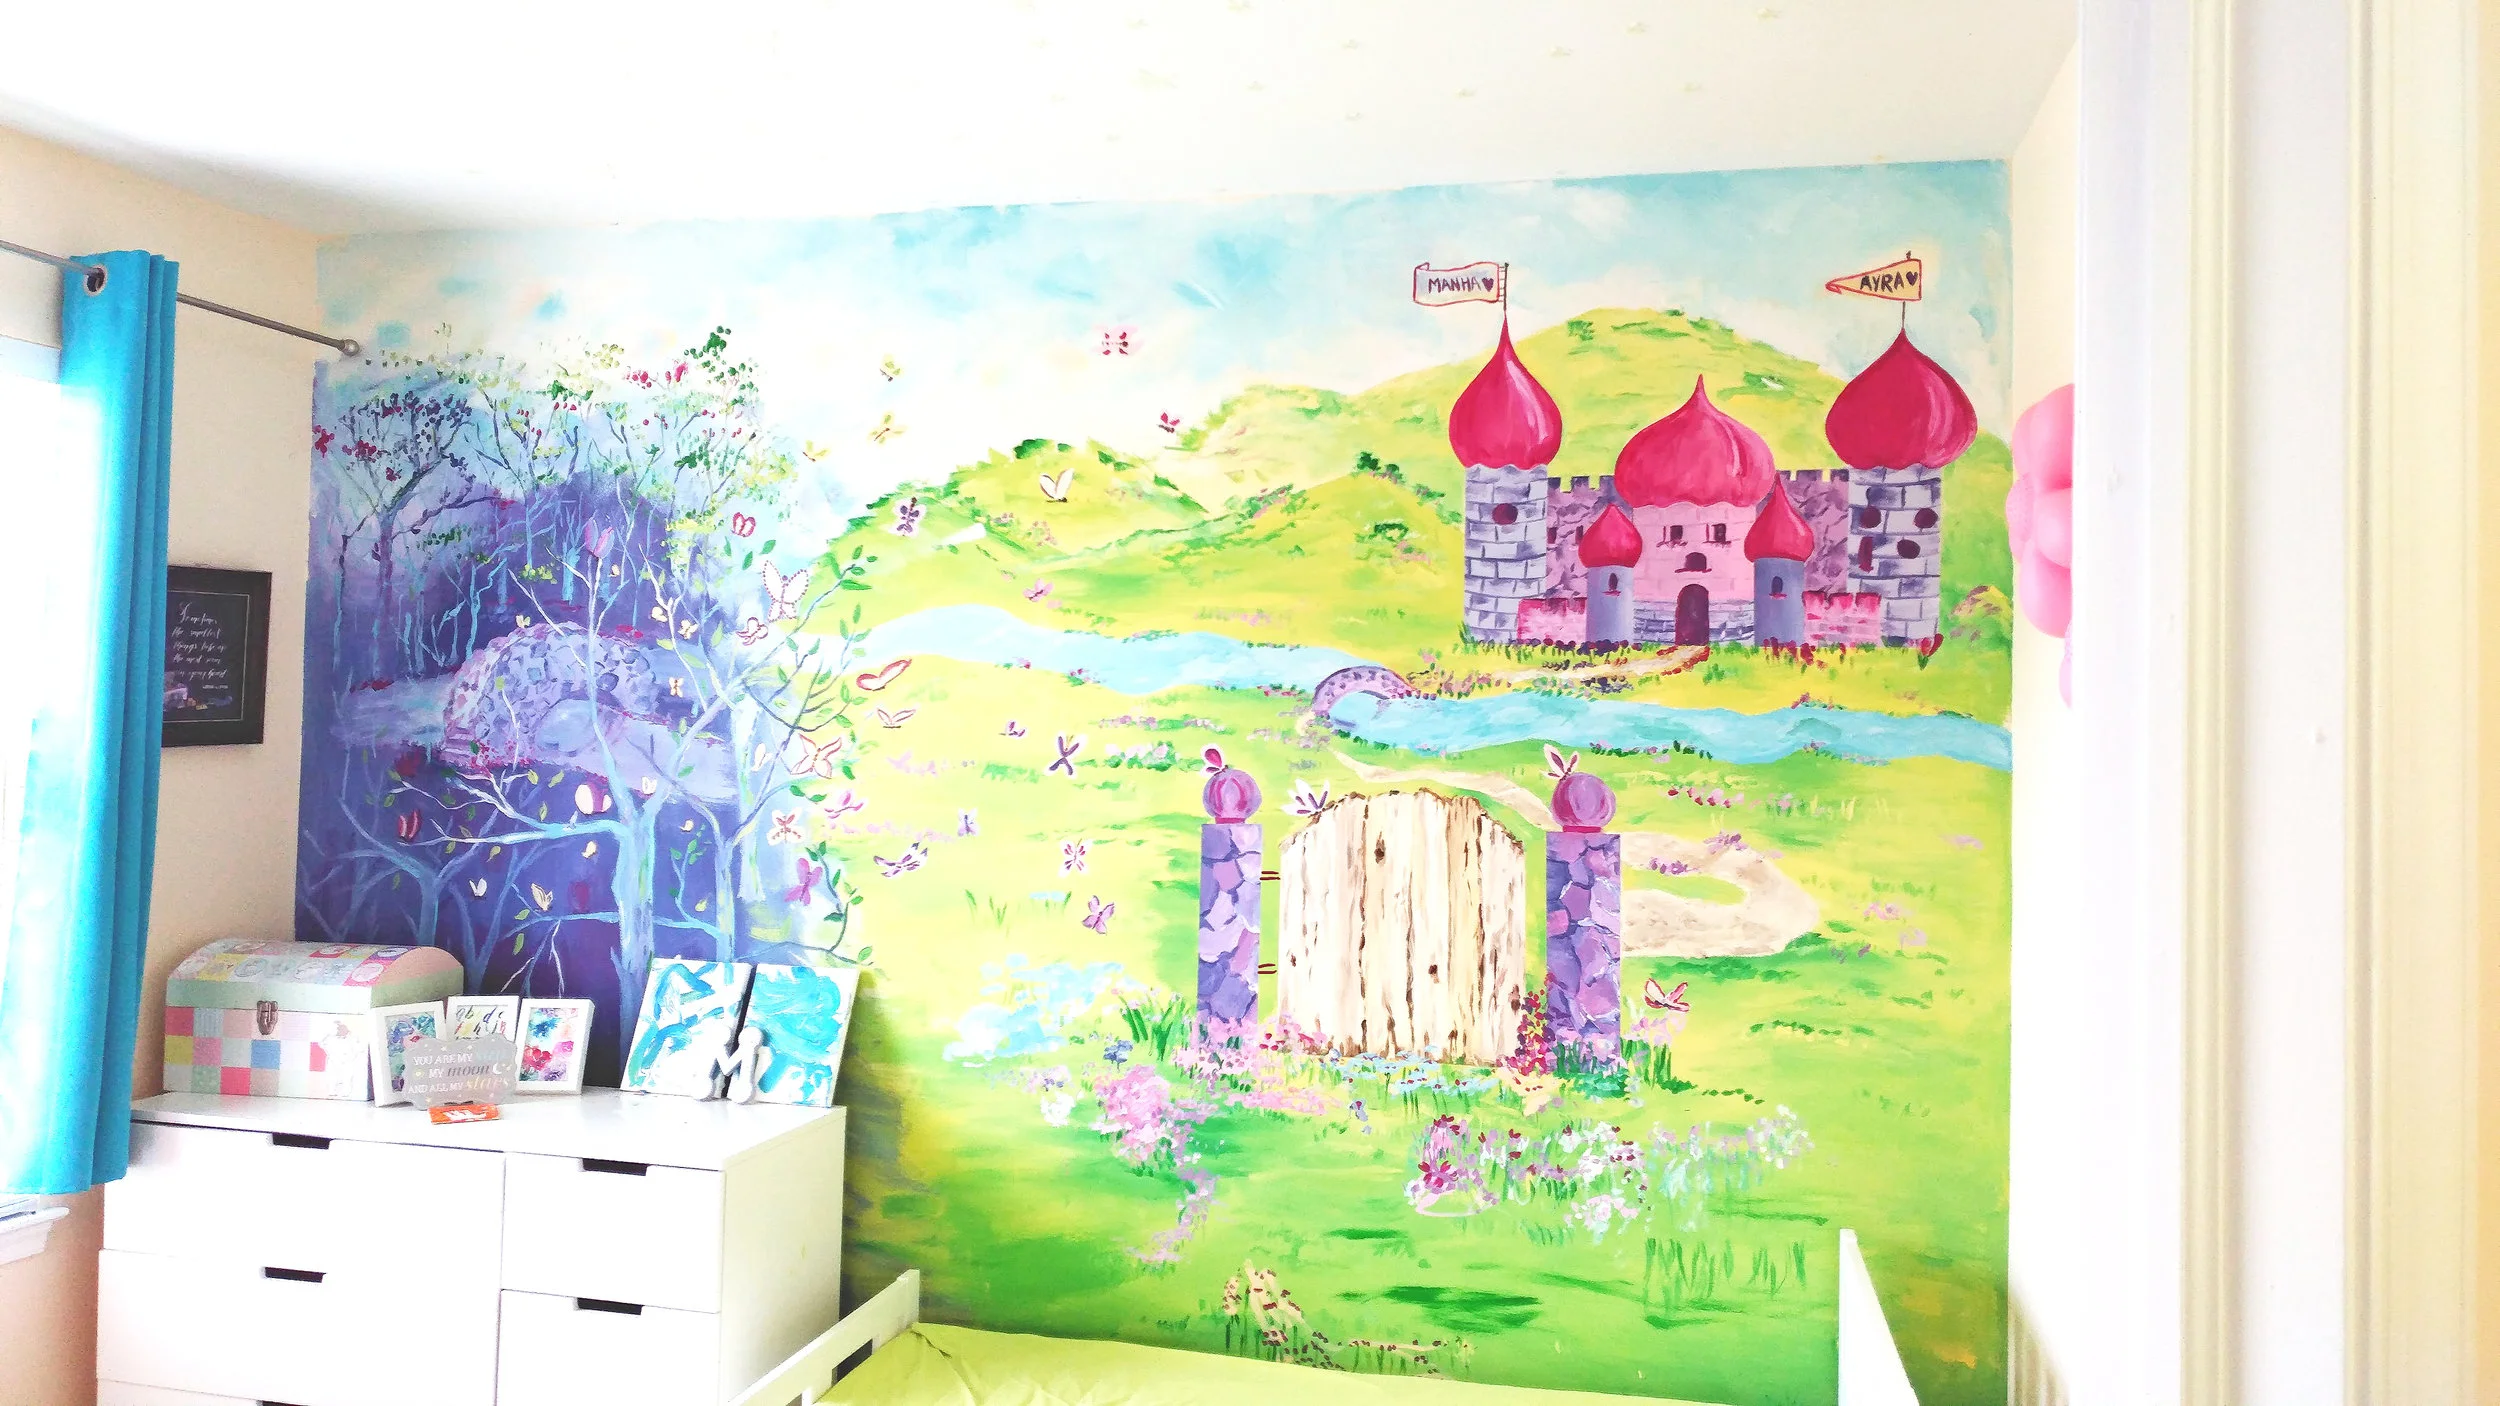
This is a long and detailed post, so totally skim and look at the pictures if you don’t want to read it all. Finally going ahead with this project were that we had decided to stay in the same city long term. Up till now, we weren’t hundred percent sure if we were staying or moving and so it seemed pointless to spend time creating something when it would have to be taken off in a matter of months or weeks. Now that we are confident we are staying, we have finally started doing all the home tasks we had been setting off for the longest time (as if you really need an excuse to delay the menial tasks). The one I was excited about was decorating dd’s rooms. Up till now, most of the decorations were limited to hanging frames and a sharpie sketch done on an Ikea bookshelf. This project, was ambitious to do with a baby and an enthusiastic preschooler who wanted to help, but it was not difficult. In fact, I quite enjoyed having a massive canvas to paint as I wished on it. So in this post, I decided to share some tips, and just a step by step of the process that worked for us. Now I am in no way an expert in painting walls but this was really not much different than painting a canvas.
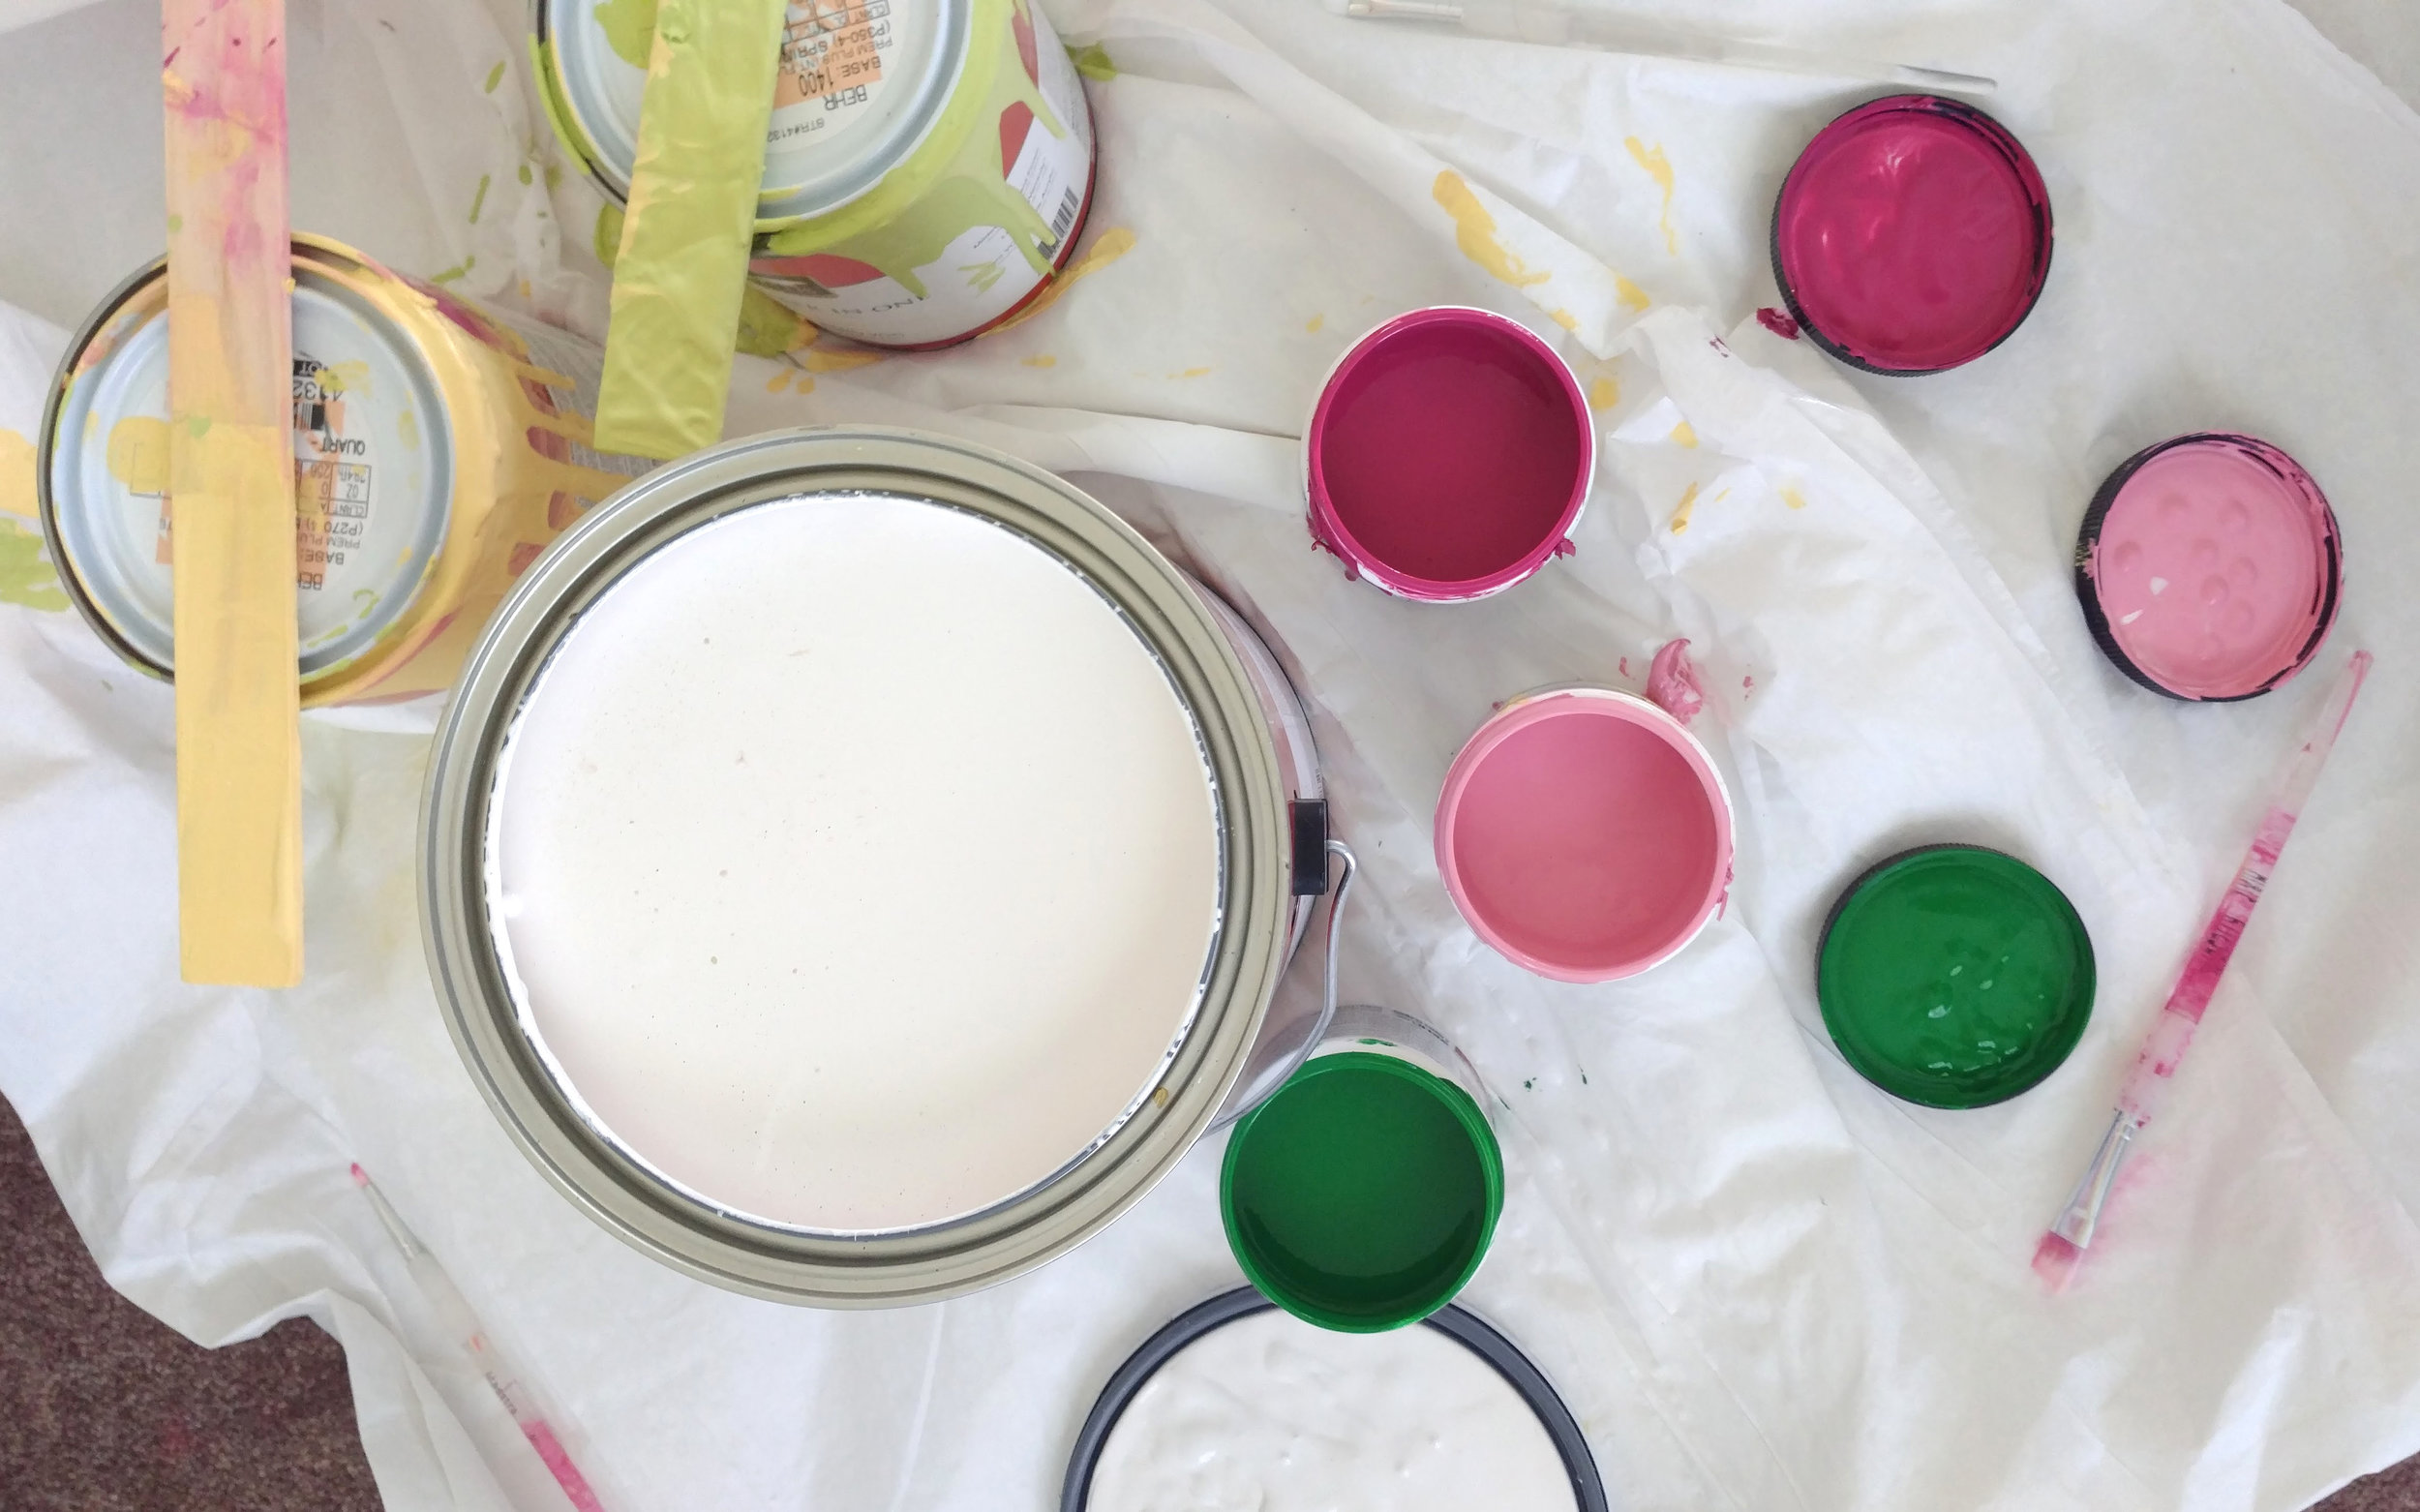
Items we got
*Behr Paint with Primer in various colors in Eggshell finish
*Full Body Suit (my paints are attracted to my clothes like magnets)
*Plastic Sheets
*Blue Painters Tape (in various sizes)
*Step Ladder (we already had one in the house so I just used that)/ Stepping stool
*Glow in the Dark Paint (the jar, not the spray)
*Paint Brushes (ranging from 3 inches to smaller detailing brushes)
* Paint Rollers with extension stick
*Paint trays
*Bucket of water
For the paint, it’s best if there is primer already mixed it as it eliminates a step while painting. If you have dark or colored wall, painting without primer would allow the background color to still show through the lighter top paint and multiple coats would be needed. Most paints today already come with the primer mixed in (atleast the ones I saw at our local home store) but if your colors don’t, you can get a gallon or quart sized container of primer as well. The primer would go on first, before starting the actual painting. Follow the directions on the can and when it is dry the painting can begin. For paint with primer (such as the Behr one we used) the paint can be used straight on the wall without adding a primer layer since the paint has it mixed in.
In terms of sizes of paint cans, we got some in quarts, and a couple of colors in sample sizes. The sample colors are relatively inexpensive and you can sometimes find them in the clearance section as well. They come in small containers and were just enough for the details on the one wall. If we had done more walls, the samples might not have been enough. They are also great to use in finalizing the colors decision. The paint chips, although useful, do not always portray the correct color as it would appear on your wall. The color on your wall can be impacted by the light, other colors in the room, refracted light and the base color of the wall to name a few. The curtains in dd’s room are turquoise and so I had to keep in mind that they would impart a bluish hue on the wall, even with the curtains open as the light bounces on them while going on the wall (geeky stuff). The rest of the room is white so there were no other colors I needed to consider. However, if you have dark or colored furniture, try a small swatch of the color on the wall to make sure you like it before painting the whole wall (and not being happy with it).
Steps

I first used a stick charcoal to draw the general layout of the painting and the bigger items such as the river and castle. We chose a couple of pictures from Pinterest to decide on the general idea of the painting and then added our own twist. It’s easier for a three year old to show you what she likes rather than having them explain it, and this three year old was very specific about wanting the flags with their names on it and having pink butterflies.
Next, I had hubby put blue tape around the edging of all sides of the wall to allow for clean and crisp edges. We moved the furniture and placed plastic sheets on the floor and taped it above the baseboard to keep the carpet and baseboard clean.
The paints need to be mixed when you open them as the colors tend to separate so don’t be scared if your pink looks purple or yellow when you open it up. I took out two or three colors in one try but kept them in the same family (i.e. blues I the same tray). For the base colors, I used the tray with a roller to paint the larger areas.
Our magnetic paint needs to be painted under the details as it has a charcoal color, so we went ahead and painted this next.
Start painting and enjoy the process. I had handed dd a paint brush as well so she could help out, it is her room after all. There were times when I had to direct her but you can always paint over colors you don’t want. In the final piece, you can see where she had helped out but those are also the parts she is proudest of and shows off so she gets to keep them, although I did tweak them a little.

Once the basecoats were dry, I started adding the details. For the crisp edges of the door and castle, I placed blue painters tape on the outside edges and then painted within that. The details took us almost a week as I had limited time. I also did not draw on the details and freehanded them all, including the trees and forest.


Finally, when all your details are dry, add glow in the dark paint on light areas (follow the directions for your make). The jar we got said it works best on lighter areas, so we used them on the butterfly wings, door, path and some of the flowers.
Neither the glow in the dark or magnetic paint are important as the paint look great without it. The magnetic paint makes the surface into a board that can attract magnets so the girls can use magnetic characters to play out stories.
The most important part, enjoy the process and final result.

(In the above picture, you can see where darling daughter decided to help out with the flowers, all while singing "dot dot dot")
So I hope the read wasn’t too long but I had quite a few questions on how long it took, what I used etc and I thought a blog post would be the best way to share our process and what worked for us. Keep in mind, different factors can influence your drying times such as weather and humidity. Your paint might dry faster or take longer to dry.
Enjoy the weekend and happy creating
Coffee and Pen Art